Great Yoga Mat Bag Tutorial. It is like a large long tote bag! Scroll down a bit, since it is on the Archive website.
You can catch these patterns on sale from various places, JoAnns, Hancocks, Hobby Lobby. Sign up for the newsletters, or read the weekly ads online.
So here are the Yoga Clothing/Props patterns that I have…there may be more…
Simplicity Sewing Pattern 3583 – Make your own yoga gear – Yoga with Gail
McCall’s MP260 or M4606- including yoga mat bag & Blanket. Two tops, two length jackets, and yoga pant. Still for sale on Ebay.
McCall’s M5664 – Halter Yoga Top, Cap, Sleeveless Shell, Yoga Jacket, Crop and Long Yoga Pant. On McCall’s website, out of print, but you probably can find it in the stores still.
McCall’s 4261 – Sports Bra Top, Long Sleeved Top, Long Skirt (?), Mat Bag, Crop and Long Yoga Pant and Yoga Jacket. (Girl standing in Tree pose.)
Simplicity 3583 – Yoga Accessories: Strap, Eyebag, Mat Bag, Meditation pillow, Zafu, Neck/knee roll and Bolster.
Kwik Sew – Known for a lot of dancer type clothing, and now Yoga/Pilates patterns.
Kwik Sew 3497 – Variations on yoga tops.
Kwik Sew 3498 – “Girls” yoga pants!
Kwik Sew 3115 – Spaghetti Strap Yoga Top, Shell Top, Capri, and Long Yoga Pant.
Kwik Sew 2723 – Racer Back Yoga Top, Boy Shorts, Runners Shorts and Jazzy Yoga Pants.
Kwik Sew 2632 – Long-Sleeved Tied Top (dancer inspired), Leotard & Long Jazzy Yoga Pant.
Kwik Sew 2722 – Unitard with either spaghetti straps or keyhole back. Short or Pant Length.
Oh, yeah, the only thing I’ve made is a large and small bolster, yoga mat bag, eye pillow, blanket and lots of zafu’s!!!
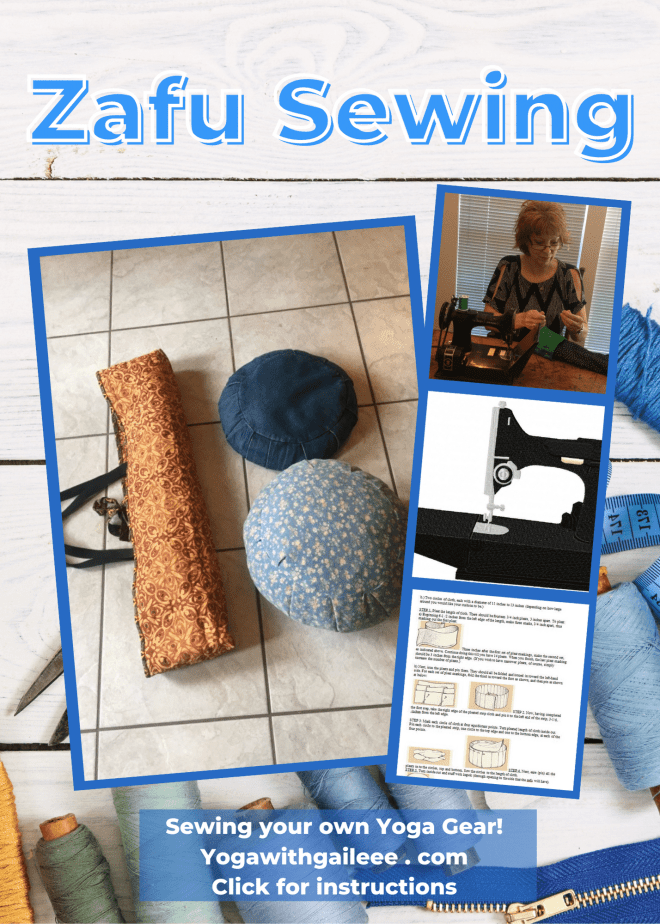
Using my Singer Featherweight to make a Zafu Meditation Yoga Cushion. Yoga Mat, Bolsters and more! Yoga with Gaileee
Sew your own yoga accessories, mat wrap, mat bag, zafu meditation pillow, yoga bolsters and more.
You know Simplicity pattern company (which you can find at Hobby Lobby, JoAnns Fabrics and online) has come out with patterns for making bolsters, cushions, yoga mat bags and such, but there is a wealth of info out there on the web to help you make your own yoga props.
Using my Singer Featherweight to make a Zafu Meditation Yoga Cushion. Yoga Mat, Bolsters and more! Yoga with Gaileee
I made my yoga mat bag out of upholstery material. I didn’t need to use any lining material because my upholstery fabric was very thick.
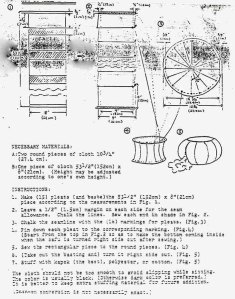
Some of the websites that listed how to make the seated meditation pillows are no longer on the web, so I’ve included the instructions onto this page. Here’s a little PDF I created based on these long ago lost internet instructions. Sewing a Meditation Cushion
Additional Meditation Pillow Instructions – Making the PleatsZafu Meditation Pillow Instructions
Old original meditation zafu instructions
Constructing a ZaButton Meditation Cushion
How to Make a Zafu and Zabuton
Posted by Som on Monday, March 13, 2006
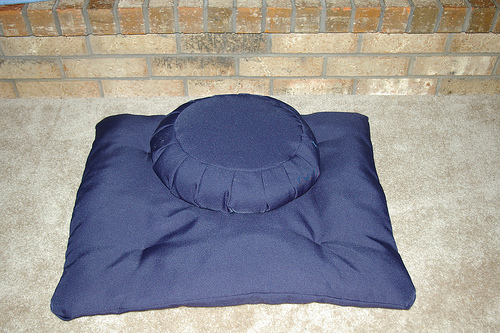
Whether you’re looking for some comfortable, casual seating or want to make your meditation sessions more pleasant, a zafu and zabuton are wonderful things to have around the house. Zafu and zabuton are traditional Japanese cushions used for meditation; the zafu is a circular pillow with pleated sides, and the zabuton is pretty much just a large, flat pillow. You can order them online for $40+ each, but it’s cheaper and more satisfying to make your own at home.
Zafu with a Zabutton meditation cushion
Crossed Legged on the Meditation Zafu & Button
Side view of sitting on the Zafu & Button. Tilts pelvis forward making for easier seated position.
(I don’t have the best meditation posture, but you get the idea of how the cushions work. The zabuton is a little small for me, because this is one I made for a friend who’s shorter than I am.)
The zafu elevates and cushions the pelvis, and the zabuton cushions the knees and ankles. This position facilitates better posture, eases joint and back pain, and may help one achieve deeper longer meditation sessions. As long as you’re making one set, why not make two? Keep the extra set for guests, give it to a friend who meditates or has back problems, or donate it to your local Zen center or Buddhist temple.
About the materials: I chose to use a cotton/polyester blend for these because it’s cheap and easy to clean with a wet rag; these aren’t something you can just throw in the washing machine. When I’m more settled in my meditation practice, I’ll probably make another set out of some heavy silk, perhaps adding some colorful embroidery or sashiko stitching.
As for filler, I used organic pillow-grade buckwheat hulls for the zafu and plain ol’ polyester stuffing for the zabuton. Kapok would be a better choice for both, but it’s fairly expensive.
Click below for full instructions on how to make the zafu and zabuton. Zafu Materials:
Cotton/polyester blend fabric, 2 yards (note: 2 yards is enough for two zafu)
Pillow-grade buckwheat hulls, 5 lbs.
Zipper
Sewing thread
Sewing machine
Hand-sewing needle, pins, scissors
Iron, ironing board, and water spray bottle
Sewing a Meditation Cushion. That’s what I started with, but I had to tweak it a little for my own use. I recommend downloading it even if you’re going to use my instructions, as the illustrations in the PDF are quite helpful.
Cut a strip of fabric 65″ x 7″ (there are a few extra inches in the length for fudging purposes.) Cut two circles 13″ in diameter – I used a 13″ round serving plate for my template, but you could also make from cardboard using a compass and a pencil.
Pleat the long strip of fabric: measure 4.5″ inches from one end and mark. Make two more marks 3/4″ from the first. Measuring from your center mark, repeat the process every 4″ until you have 14 pleats marked. Fold, iron, and pin the pleats (since the iron setting for polyester blends usually isn’t high enough for steam, use a water spray bottle for best results.)
On the end, you started pleating at, fold back the fabric 1/2″ and iron. Begin pinning the strip of fabric around one of the fabric circles. When you get to the end, you’ll have a few extra inches of fabric. Fold back and iron. Pin your zipper in place on the folded ends of the fabric, making sure to cut and secure the zipper at least 1″ away from the top and bottom of the fabric to allow room for sewing. Use the sewing machine and a zipper foot to sew the zipper in place; hand-stitch the remaining seam of the side strip width. Trim the extra fabric behind the zipper.
Using the sewing machine, stitch the side fabric strip to the first circle of fabric with a 3/8″ seam allowance. Then pin and sew to the second circle. Trim the extra thread, remove any remaining pins, and turn the pillow. Stuff as much buckwheat hull as you can into the pillow. This is a little tricky, as buckwheat hulls are tiny and quite devious. Also, they really hurt under bare feet. Fill it as much as you can, shake it down, and fill some more. I used almost all of the 5 lbs. of buckwheat hulls I purchased. Once it’s full, try it out. You may find that you’d be more comfortable with more or less filling – hence the zipper. (And, I’ll admit, I’m terrible at blindstitching. The zipper is my way of cheating.)
If you want to make your circles a different diameter, here is how you calculate where to place your pleats and how long a strip of fabric you need: Multiply the diameter of your fabric circle by pi (3.14159.) This will give you the circumference; for a 13″ diameter, I got a 40.84″ circumference. Add 1″ for the zipper seams (=41.84″.) For 14 pleats, each 3/4″ and using 1 1/2″ of fabric, add 21″ (=62.84″.) Add a couple of inches for fudging purposes, so you’ll be sure not to run out of fabric and have to start all over again (=65″.) To determine where to put your pleats, take the length of your fabric strip, minus the 1″ of seam allowance and 2″ or so for fudging allowance (in my case, 62″.) Divide by 15 (=4.13″.) Round off as best as you can (=4″.) Remember to add your 1/2″ seam allowance for the measurement before the first pleat (=4 1/2″.)
Zabuton Materials:
Cotton/polyester blend fabric, 1 1/2 yards
Polyester, cotton, or kapok stuffing, ~2 lbs.
Sewing thread, machine, etc.
Cut two rectangles of fabric, 32 1/2″ x 27 1/2″ (if you’re over 6′ tall, add a few inches to both dimensions. You need it to be big enough to accommodate you when sitting cross legged with your knees comfortably cushioned on the zabuton.) Note: Cutting a straight line that long can be difficult. In order to make sure that my cuts are indeed straight, and that I end up with 90o angles, I use the pulled thread method for cutting straight lines in the fabric.
Pin the rectangles together and stitch around the edges with a 3/8″ seam allowance, leaving an opening about 4″ wide on one side for turning and stuffing. Make sure to backstitch at the corners and on both sides of the opening. If you like, you can stitch a small curve on the edges or add a rise, but it’s not necessary.
Turn and stuff. A word about polyester stuffing: it’s tempting to just grab wads of stuffing and jam it in there without a care in the world, but you’ll end up with a lumpy, unusable pillow. Take the time to do it right. Grab a handful of stuffing and pinch off little pieces. You can make a big pile of pinched stuffing and then stuff the pillow by the handful. You’ll use a lot less stuffing this way, and your zabuton will be nice and fluffy – not lumpy.
Once the zabuton is stuffed to your liking (I stuffed to about a 2″ rise,) stitch the opening shut. To keep the stuffing from shifting about too much, tuft the zabuton. I added four tufts, each about 8″ from the corners toward the center of the pillow. To tuft, take a sewing needle and an 18″ length of thread. Double your thread and pierce both layers of the pillow; pull the needle through, but leave a few inches of thread on top. Bring the needle back through both layers of pillow near the first stitch. Pull both ends of the thread tight and tie it off carefully. Clip the extra thread. And you’re done!
Sewing your own yoga gear. My nice long yoga mat bag from upholstery material, plus yoga straps for the handles. Zafu Meditation seat cushions (pillows) made from denim. I’ve had the mediation pillows for years,, they have held up nicely! Yoga with Gail. 409-727-3177

 patterns on sale from various places, JoAnns, Hancocks, Hobby Lobby. Sign up for the newsletters, or read the weekly ads online.
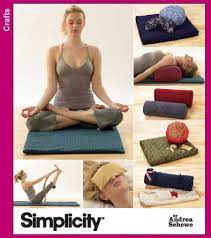

 3498 – “Girls” yoga pants!
 Kwik Sew 2632 – Long-Sleeved Tied Top (dancer inspired), Leotard & Long Jazzy Yoga Pant.


You must be logged in to post a comment.